Deploy Satori CH on AWS ECS
The following section describes the main components of the Satori Customer Hosted (CH) platform and how to deploy them on AWS ECS.
Introduction to Satori CH for AWS ECS
The Satori CH platform consists of two main components:
- The Satori Management service, maintained by Satori.
- The Satori Customer Hosted (CH) Data Access Controller (DAC), a terraform based ECS orchestration that is deployed on an AWS Elastic Container Service (ECS) inside the customer's VPC.
Deploying Satori Customer Hosted (CH) DAC
Deploy the Satori CH DAC in the same public cloud region as the data stores that the Satori CH DAC is meant to protect.
For example, customers using RDS Postgres on AWS us-east-1 should deploy the Satori DAC on a VPC in the same region (AWS us-east-1).
Multi-Region Deployments
For customers who operate data stores in multiple regions, a Satori CH DAC should be deployed for each separate region.
Satori VPC Deployment Architecture on ECS AWS
The following two diagrams illustrate the Satori architecture when deployed in a customer's virtual private cloud (VPC) on AWS.
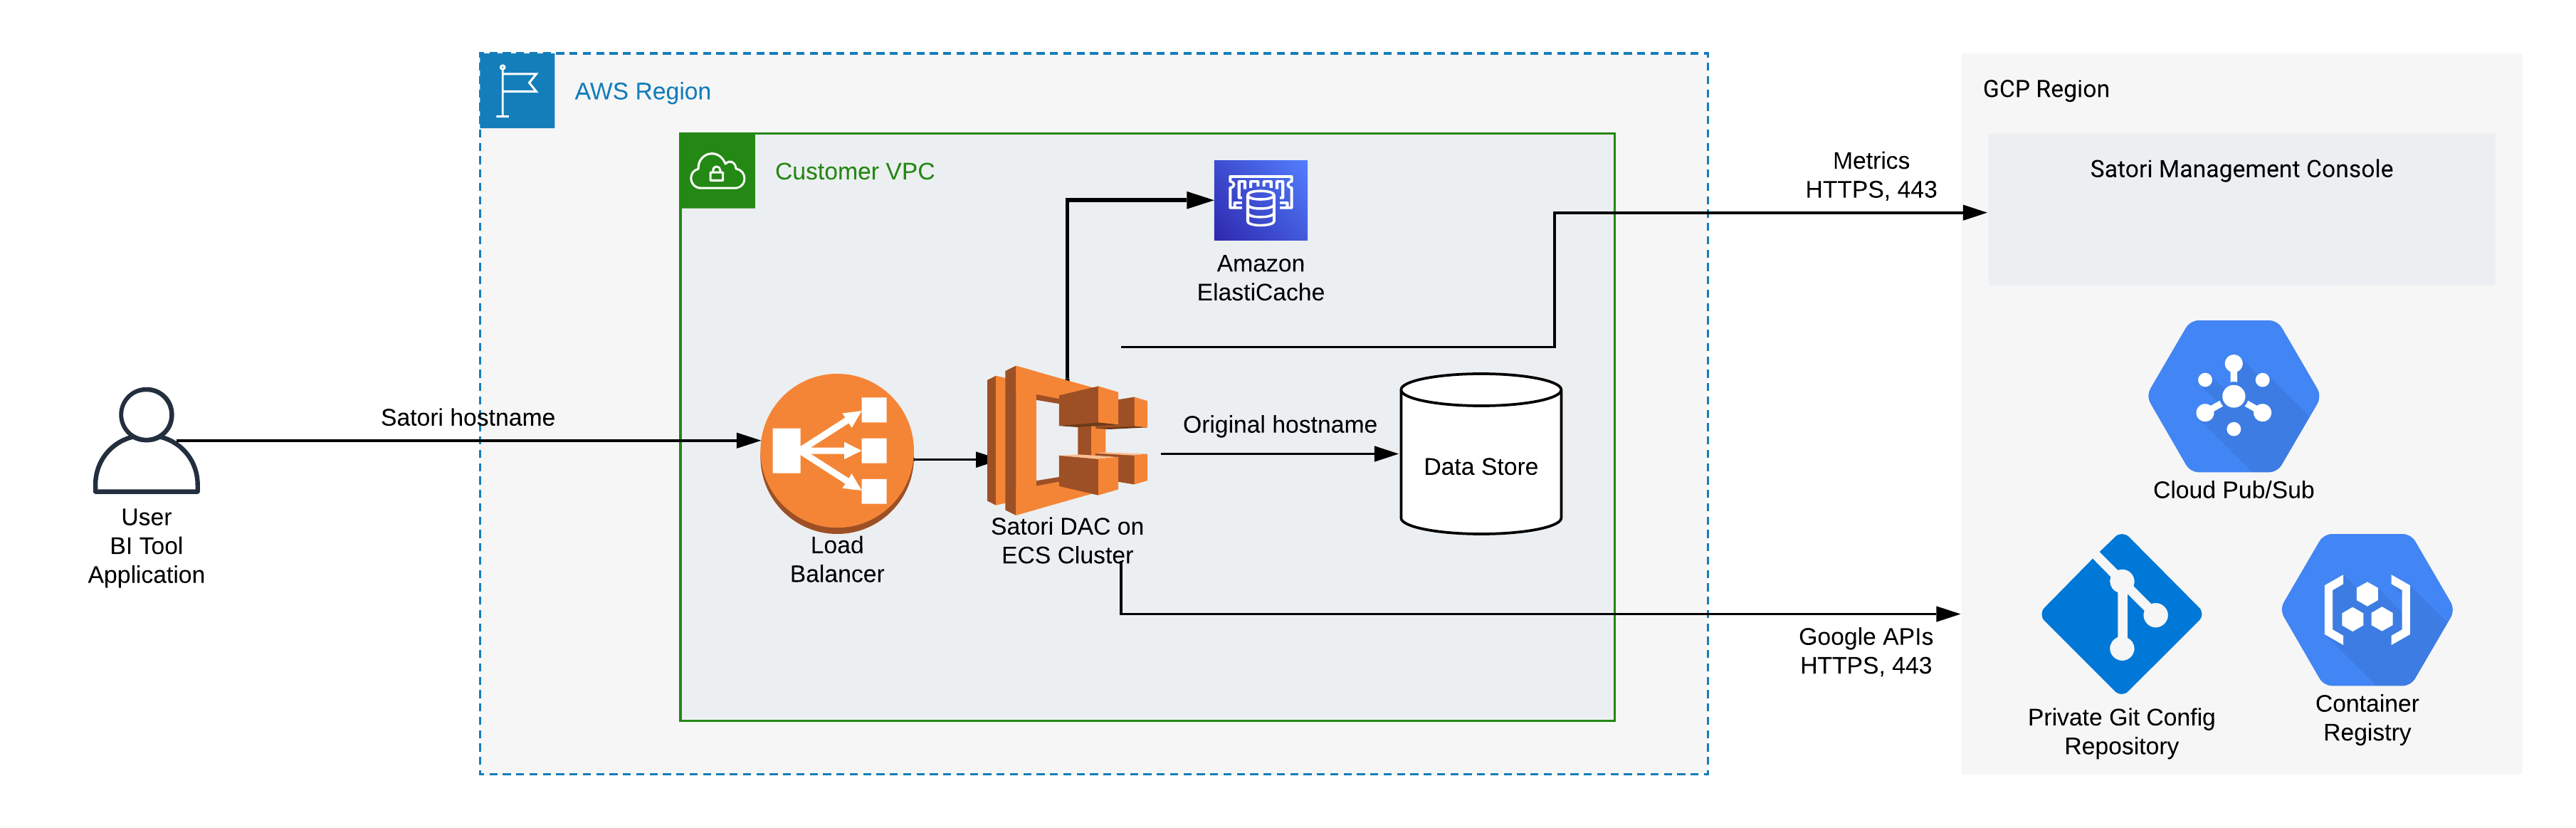
Illustration 1 - High Level Satori Deployment on AWS ECS Architecture
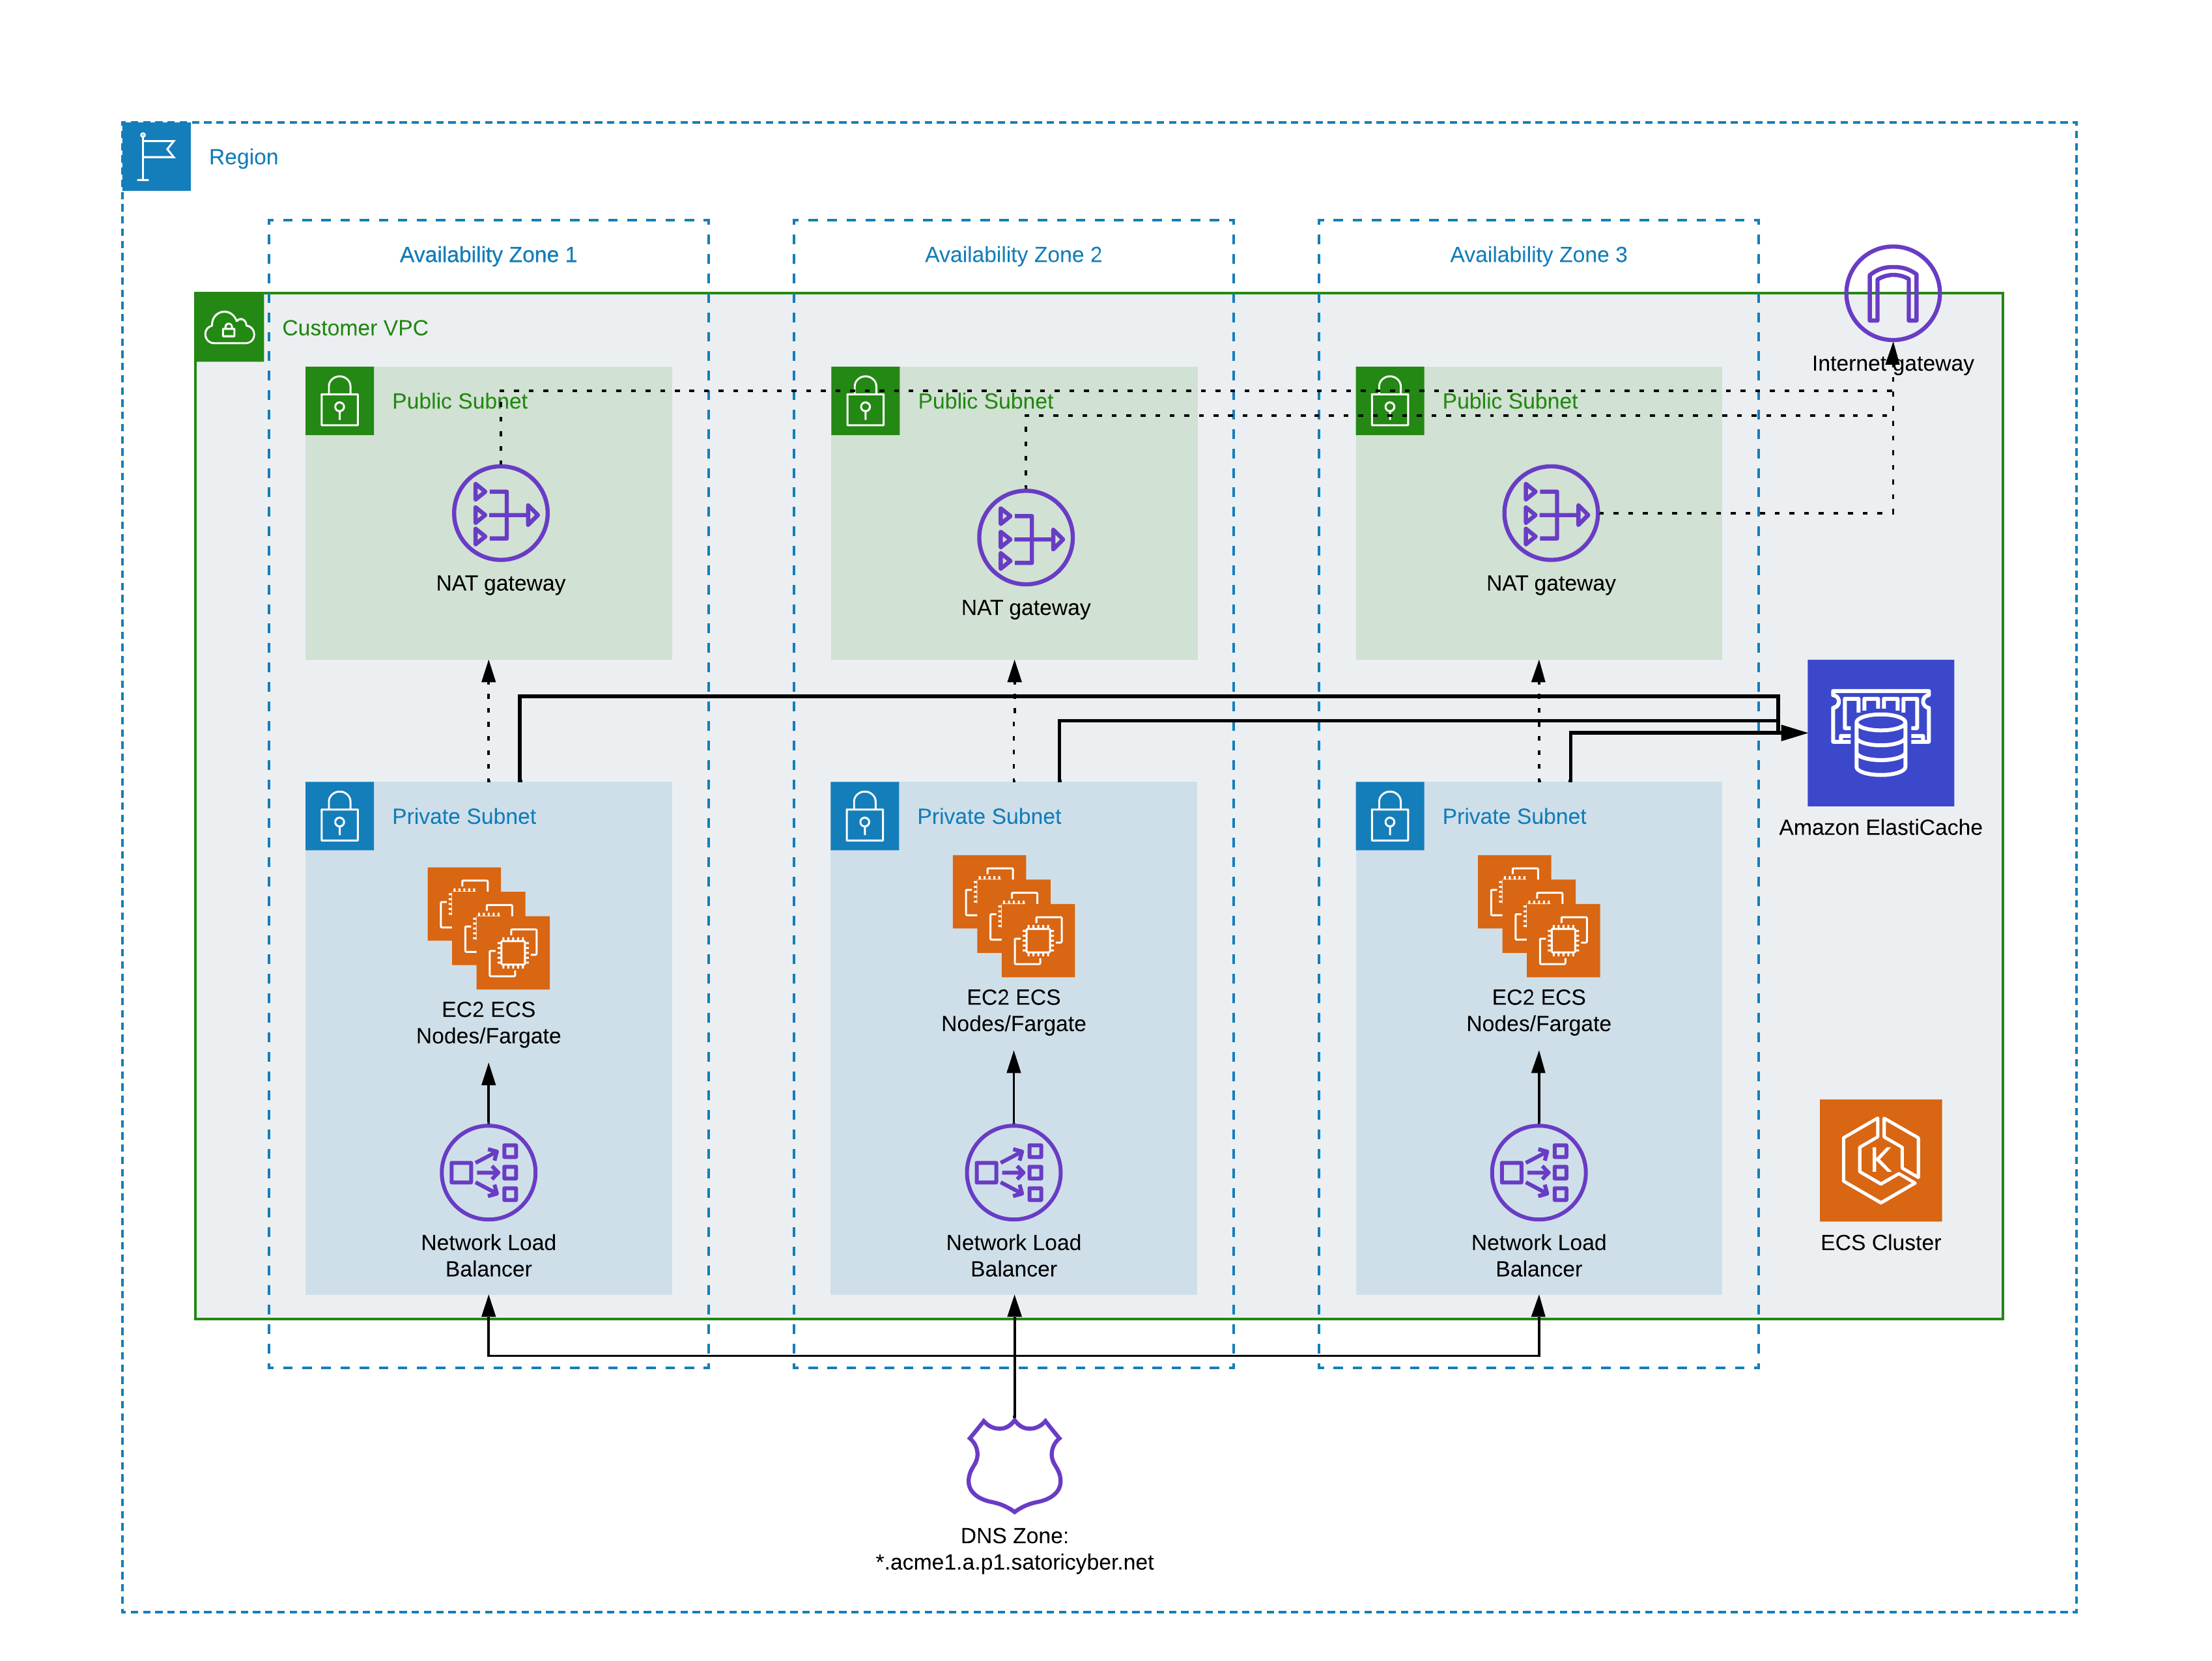 Illustration 2 - ECS Cluster Architecture
High level Deployment Steps
Satori provides assistance for the following deployment steps for a Customer Hosted DAC, including:
- Customer Task - Prepare the network for deployment.
- Customer Task - Prepare the ECS cluster and provision supporting AWS services.
- Customer Task - Deploy the Satori DAC.
- Satori Task - Reference a new CNAME for the DAC
- Operational Task - Configure a self-hosted DNS and SSL for the DAC

Satori CH DAC Network Configuration
The Satori CH DAC requires the following network path configurations:
- High availability - Satori recommends using a VPC with 2 subnets or more across 2 availability zones or more.
- User Connection to the Satori DAC - Users connect to data stores via the Satori DAC, therefore a network path from users to the Satori DAC is required.
- Satori DAC Connection to the Data Store - the Satori DAC receives queries from users and then sends them to the data stores it protects, so a network path from the Satori DAC to the data stores is required. Typically, this is established by deploying the Satori DAC in the same VPC as the data stores it protects and ensuring that the AWS security groups allow access from the Satori DAC to the data stores.
- Verify the egress traffic to the following host addresses: app.satoricyber.com, .google.com, .googleapis.com and us-docker.pkg.dev on port 443 - Satori uses several services from the Google cloud platform (GCP) as well as a GIT repository that contains the Satori DAC's configuration files, a secret manager for secure storage of secrets and a messaging service to publish data access metadata that is shared with the management console. The full list of fields that are sent is available here: Metadata Shared by Data Access Controllers with the Management Console.
- Verify the egress traffic to the following host addresses: cortex.satoricyber.net, alert1.satoricyber.net, alert2.satoricyber.net, alert3.satoricyber.net - the product telemetry (metrics) are uploaded here.
Private or Public Facing Data Access Controller
You can choose to deploy a private, VPC-only facing Satori CH DAC, or a public, internet-facing Satori CH DAC.

The following section describes how to deploy a typical ECS Fargate-based cluster and AWS ElastiCache(Redis).
Prerequisites
To deploy an ECS cluster and AWS ElastiCache, ensure the following access privileges and third party products are installed and made available:
- Administrator Level Access to the Following AWS Services - IAM, VPC, NAT gateway, Internet gateway, Network Load Balancer, CloudWatch, ECS, ElastiCache
Recommended Specification
-
Basic ECS cluster with a Fargate-based infrastructure
-
ElastiCache(Redis):
- Cluster of type
cache.t4g.micro. The ElastiCache must be created in disabled cluster mode. - Version 7.X.
- At least 2 replicas for HA.
- TLS encryption in transit must be enabled.
- Set the default port number as 6379.
- Deploy the cluster to the same VPC and subnets as the Satori DAC.
- Cluster of type
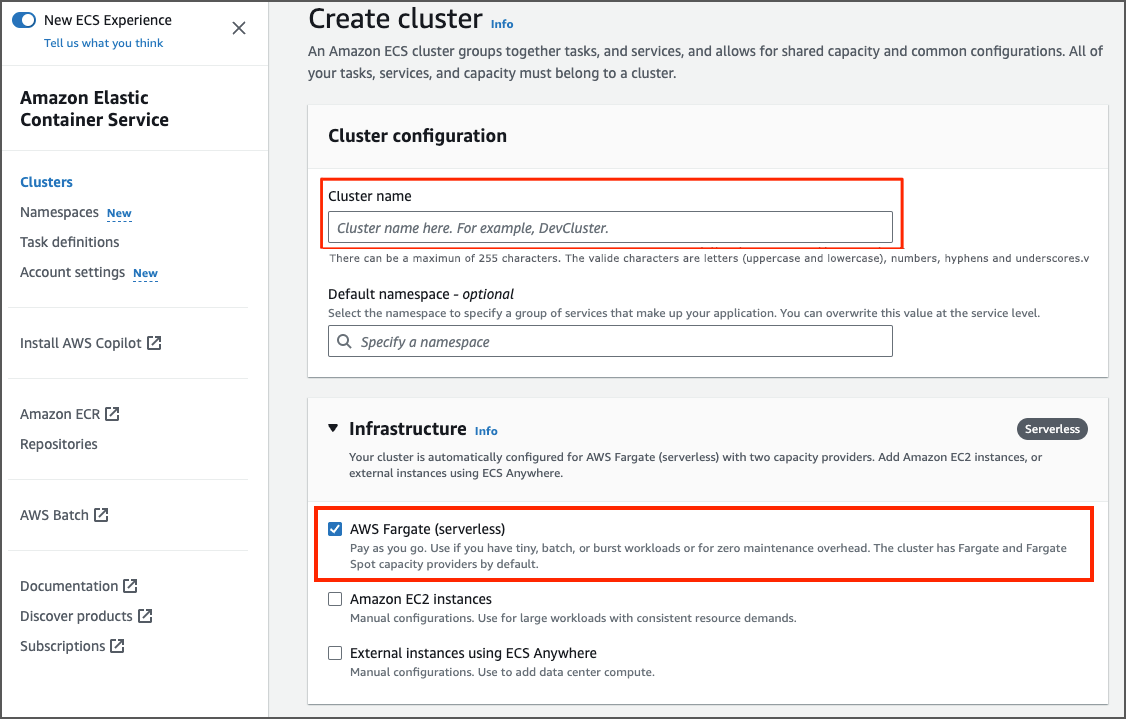
Setting Up a ECS Cluster
Create a simple ECS Cluster: - Enter the cluster name. - Select the AWS Fargate infrastructure option.
Setting Up an ElastiCache Cluster
Create an ElastiCache Cluster: - Enter the cluster name. - In the cluster mode select the disabled option. - Enter the size, version and other properties and create the cluster.

Setting up the ElastiCache IAM authentication: - To understand how to setup the ElastiCache IAM authentication go to the AWS Guide for ElastiCache IAM authentication.
- Create a role with the following trust policy (replace the
with your actual value):
{
    "Version": "2012-10-17",
    "Statement": {
        "Effect": "Allow",
        "Principal": { "AWS": "arn:aws:iam::<account_id>:root" },
        "Action": "sts:AssumeRole"
    }
}
- Create a permission IAM policy (replace the
, , and with your actual values):
{
  "Version": "2012-10-17",
  "Statement": [
    {
      "Effect" : "Allow",
      "Action" : [
        "elasticache:Connect"
      ],
      "Resource" : [
        "arn:aws:elasticache:<region>:<account_id>:replicationgroup:<elasticcache_cluster_name>",
        "arn:aws:elasticache:<region>:<account_id>:user:<redis_user>"
      ]
    }
  ]
}
- Attach the previously created permission policy to the role.
- In AWS ElastiCache Console create an ElastiCache
with the same name as specified during the IAM policy creation. Specify the access string as on ~* +@all - Create a ElastiCache Group and add the default user and the
you just have created. - In the ElastiCache cluster properties set the Access control to
User Group access control list. In the User group set the Redis group you just have created.


Prerequisites
- Administrator Level Access to the Following AWS Services - IAM, Secret Manager, VPC, Network Load Balancer, CloudWatch, ECS.
- Terraform CLI is installed on the Command Line - To verify terraform is installed run the following command:
terraform version. To download terraform go terraform.
Deploying the Satori Task on the ECS Cluster
The Satori terraform package is available in a deployment package which you download from the Satori management console. Follow these steps to download and deploy the deployment package. Please, verify with the Satori support team that the installation terraform package is fully configured with your specific infrastructure settings. The following properties should be provided to Satori support team in order to do configure the installation package:
- aws_region - the name of the AWS region where the ECS is deployed.
- cluster_name - the name of the ECS cluster.
- vpc_id - VPC ID - where the ECS is deployed.
- private_subnets - list of private subnets IDs where the ECS task will be running.
- public_subnets - list of public subnets IDs where the Load Balancer will be created. This variable is needed only if the DAC is internet-facing.
- allowed_cidr_blocks - List of allowed CIDR blocks. If you want to allow accessing the DAC from any place, provide ["0.0.0.0/0"].
- redis_endpoint - FQDN of the redis primary endpoint without the port number.
- redis_cache_endpoint - FQDN of the redis primary endpoint without the port number. ( Can be the same as redis_endpoint ).
- redis_aws_role_arn - The Role ARN which is used for IAM authentication to the ElastiCache.
- redis_username - The Redis username which is used as a part of the IAM authentication to the ElastiCache.
Download and Install the Satori Package
Note: Secrets are provisioned as part of the terraform installation process. You must upgrade your DAC to enable the secrets to be rotated. Satori recommends that you upgrade your DAC once a week.
Once the all the configurations are set, you can download the installation package and perform the following steps:
- Click here and login to the Satori Management Console.
- Go to the Settings section and select the Data Access Controllers view then choose the target DAC for deployment.
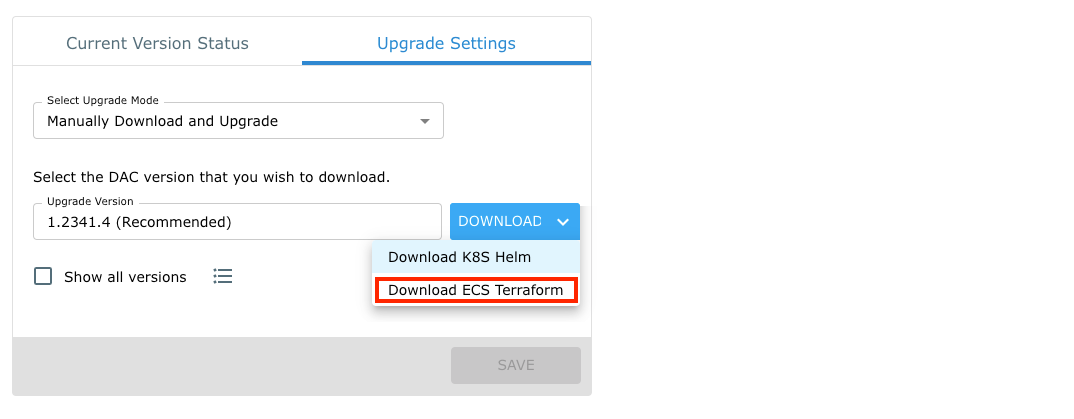
- Select the Upgrade Settings tab and select and download the terraform ECS recommended deployment package.
- Extract the deployment package and open a terminal window, go to the directory where the deployment package has been extracted. For example:
tar -xf satori-dac-1.2343.2.tar
cd satori-2343
Step 5
Create/copy the backend.tf file (the file name can be different but must have the .tf extension) with your actual terraform backend settings. The terraform backend is required to manage the terraform state. For example the backend stored in Google GCS Bucket:
terraform {
  backend "gcs" {
    bucket = "satori-dac-prod"
    prefix = "satori/prod-dac-1"
  }
}
Step 6
Obtain your Satori service account ID and the service account key. Use an existing key or create a new one in the Satori Management Console. The service key must be a member of the Data access controller package manager role or higher.
Step 7
Replace the<service_account_id> and the <service_account_key> with the actual values and run the DAC install command:
terraform init
terraform apply  -var-file=./version-values.tfvars -var-file=./customer-values.tfvars -var-file=./customer-override.tfvars -var="service_account_id=<service_account_id>" -var="service_account_key=<service_account_key>"
Step 8
Now verify that the task is up and running in your ECS cluster.
- Now verify that the task is up and running in your ECS cluster.