AWS S3 Guide (Beta)

Support for AWS S3 is available in private beta for select customers. To gain access to the beta version, email us at support@satoricyber.com.
Satori streamlines and simplifies the process of controlling access to data in AWS S3. Satori reduces the risk of data leakage caused by misconfiguring users or permissions. When using Satori to deliver access to data in AWS S3, organizations provision a single set of AWS credentials that are only used by the Satori DAC to access AWS S3. Satori generates temporary credentials for data consumers instead of their existing AWS credentials. The benefits of this approach are as follows:
- There is no need to create an AWS IAM user for each data consumer, which reduces the risk of granting access to AWS resources that users do not require.
- Auditing user access to data in AWS S3 is performed via Satori, without requiring you to activate native AWS logging which does not differentiate between user and machine access.
Note: Satori protects S3 data using Satori Datasets, Dataset Permissions, and Auditing. Security policies and Masking Profiles are not supported on AWS S3 data stores. To enforce security policies on data in S3, data must be queried via one of the supporting data stores such as AWS Athena, AWS Redshift Spectrum, Snowflake or others.
S3 Tutorial and Overview
Prerequisites
Perform the following steps to grant Satori access to AWS S3.
Step 1: Create an IAM Policy for Satori
The IAM policy implemented by the Satori AWS user should be configured with access to any S3 bucket where data that requires control is stored. For maximum security, the policy should limit access to S3 only via the Satori DAC IP addresses. Below is an example of an IAM policy you can use as a starting point to create your own IAM policy:
- Consider replacing the wildcard actions list with specific actions, as required
- Consider replacing the wildcard resources list with specific buckets, as required
- Replace the IP addresses with the IP addresses of the DAC
{
    "Version": "2012-10-17",
    "Statement": [
        {
            "Sid": "VisualEditor0",
            "Effect": "Allow",
            "Action": [
                "s3:*"
            ],
            "Resource": [
                "*"
            ],
            "Condition": {
                "ForAnyValue:IpAddress": {
                    "aws:SourceIp": [
                        "1.1.1.1",
                        "2.2.2.2",
                        "3.3.3.3"
                    ]
                }
            }
        }
    ]
}
Perform the following§ steps to create the IAM policy for Satori:
- Go to AWS IAM
- Click on Policies and select Create Policy
- Click the JSON tab and paste the JSON policy file you prepared.
- Complete the policy creation process and name your policy, for example: satori_s3_policy.
Step 2: Create an IAM User for Satori
- Go to AWS IAM.
- Click on Users and select Add Users.
- Enter
satori_s3_userin the Username input field and check theAccess key - Programmatic accesscheckbox. - Select Attach Existing Policy and search for the policy created in the previous step.
- Now, attach the policy to the user.
- In the last step of the process, copy the AWS Access Key ID and Secret Access Key.
Adding an AWS S3 Data Store to Satori
- Login to the Satori management console https://app.satoricyber.com.
- Go to the Data Stores view and click the Add Data Store button.
- Select the AWS S3 option.
- Provide an informative name for the data store, for example: S3 US-East-1.
- Select the AWS region where your data is hosted, for example:
us-east-1. - Select the Data Access Controller to use for accessing the data store.
- Enter the AWS account ID for the S3 data store.
- Enter the AWS Access Key ID and Secret Access Key you copied in the previous step.
- Click the Create button.
- Satori will then validate that the credentials and AWS Account ID match and you will then be redirected to the Data Stores list.
Connect to AWS S3 via Satori
Each user can generate personal credentials from the Satori Data Portal. In this option, <SATORI_USERNAME> and <SATORI_PASSWORD> shown in the example below refer to the generated username and password.
Connecting with the AWS Command Line
To connect to S3 via Satori using the AWS command line, first create a profile using your personal credentials. For example:
export AWS_ACCESS_KEY_ID='<SATORI_USERNAME>'
export AWS_SECRET_ACCESS_KEY='<SATORI_PASSWORD>'
Then add the endpoint-url parameter to your aws s3 command with the Satori hostname for the data store. For example:
aws s3 ls --endpoint-url https://s3.us-east-1.a.p0.satoricyber.net.
Connecting with Python
To connect to S3 via Satori using Python, set the endpoint_url argument to the client function and configure the client to use path-style addressing. For example:
import boto3
from botocore.client import Config

client = boto3.client(
  service_name='s3',
  region_name='us-east-1',
  endpoint_url='https://s3.us-east-1.a.p0.satoricyber.net',
  aws_access_key_id='<SATORI_USERNAME>',
  aws_secret_access_key='<SATORI_PASSWORD>'
  config=Config(s3={'addressing_style': 'path'})
)
Connecting with Java
To connect to S3 via Satori using the AWS Java SDK, set the serviceEndpoint parameter and configure the client to use path-style addressing. For example:
import com.amazonaws.auth.AWSStaticCredentialsProvider;
import com.amazonaws.auth.BasicAWSCredentials;
import com.amazonaws.client.builder.AwsClientBuilder.EndpointConfiguration;
import com.amazonaws.services.s3.AmazonS3;
import com.amazonaws.services.s3.AmazonS3ClientBuilder;

class S3Example {

    public static void main(String[] args) {
      AmazonS3ClientBuilder s3Builder = AmazonS3ClientBuilder
          .standard()
          .withPathStyleAccessEnabled(true);

      s3Builder.setEndpointConfiguration(
          new EndpointConfiguration("https://s3.us-east-1.a.p0.satoricyber.net", "us-east-1")
      );

      s3Builder.setCredentials(
          new AWSStaticCredentialsProvider(
              new BasicAWSCredentials("<SATORI_USERNAME>", "<SATORI_PASSWORD>")
          )
      );

      AmazonS3 s3 = s3Builder.build();
      s3.listBuckets();
    }

}
Connecting with Cyberduck
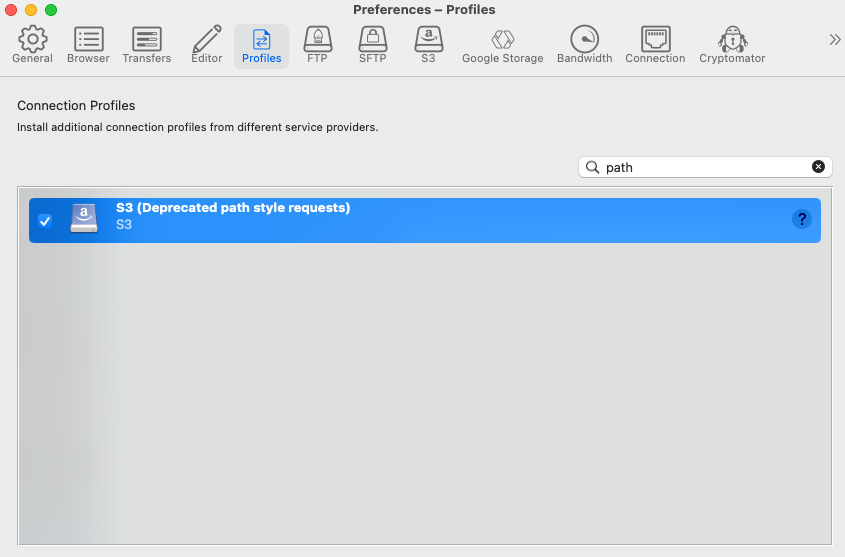
To connect to S3 via Satori using Cyberduck, enable the S3 (Deprecated path style requests) connection profile in the Profiles preferences tab:
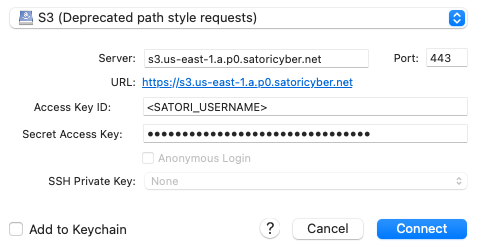
To create a new connection, click the Open Connection button, select the S3 (Deprecated path style requests) profile and then enter the Satori hostname in the Server field (without https://):
Network Policy Settings
Satori provides you with the ability to define your network security policy for your data store.
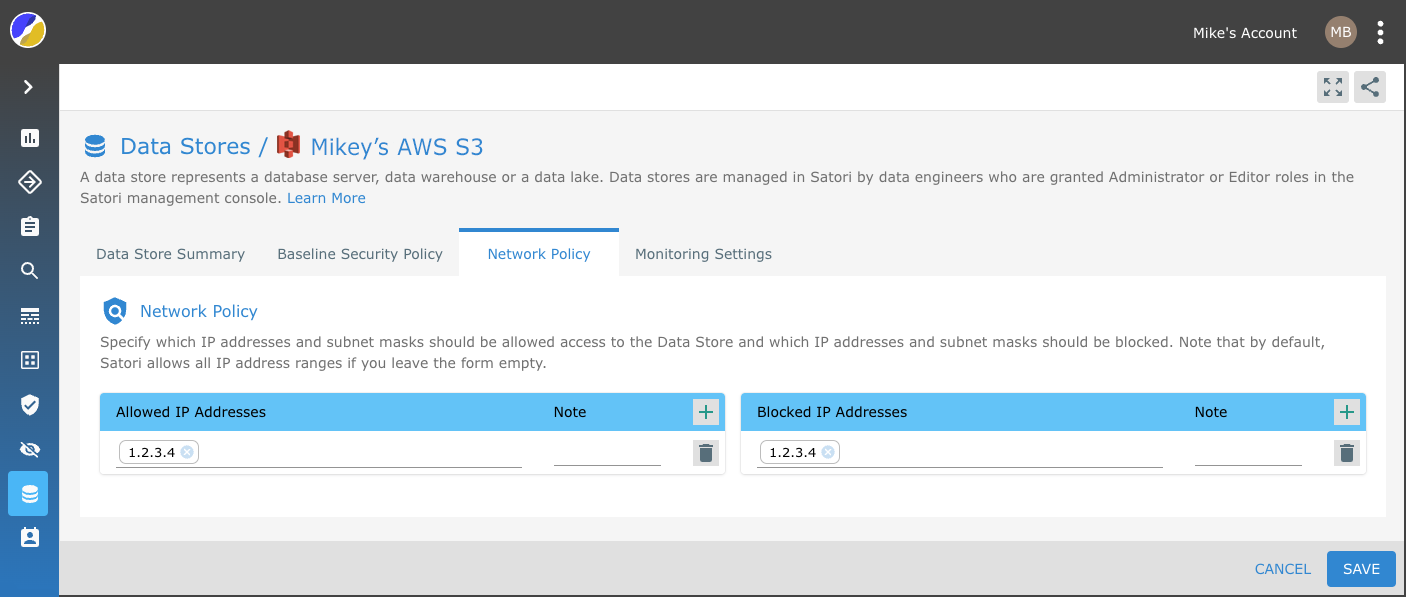
Simply, specify which IP addresses and subnet masks should be allowed access to the Data Store and which IP addresses and subnet masks should be blocked. Note that by default, Satori allows all IP address ranges if you leave the form empty.
Example 1
To allow all IP addresses - Leave the form empty.

Example 2
To block specific IP addresses - Add them to the blocked IP address list.

Example 3
To only allow access to specific IP addresses - Add them to the allow list. Note: Access from all other IP addresses ware blocked.

Example 4
To allow access from a specific IP address range while blocking parts of the range - Add the IP range to the list of allowed IP addresses and add the IP address that you wish to block to the Block list.
