Snowflake Proxy Guide
Learn more about the benefits of Satori for Snowflake and Schedule a demo meeting

It only takes a few minutes to get started with Satori. What you need is listed here:
- Access to Satori's management console.
- The hostname of your Snowflake data store, for example:
abc123.snowflakecomputing.com.
Adding a Snowflake Proxy Data Store to Satori
Perform the following steps to add a Snowflake Proxy data store to youe Satori account:
- Login to Satori's management console at https://app.satoricyber.com.
- In the Data Stores view, select Add Data Store.
- Select the Snowflake option.
- Enter an informative name for the data store, for example: Sales Data Warehouse.
- Enter the hostname of your Snowflake account, for example:
abc123.snowflakecomputing.com. You can find the hostname of your account by looking at the address bar in the browser when logging in to Snowflake. - Satori will automatically choose the correct public cloud vendor and region.
- Click Create.
- You will be redirected to the Data Stores list.
Allowing Connectivity between Satori and Snowflake
For Satori to work properly, the data access controller needs to be able to connect to your Snowflake account. To learn more about the different options of connectivity read the Satori Connectivity to Snowflake guide.
Snowflake Access Control and Satori
To learn how to leverage Snowflake's native access control capabilities with Satori read the Snowflake Access Control and Satori guide.
SAML-based Single Sign-On (SSO)
To learn how to leverage your existing SAML-based SSO to Snowflake with Satori read the Snowflake SSO.
Connecting to Snowflake using Satori
To connect to Snowflake using Satori use the Satori hostname that was generated by the management console which can be found under Satori Hostname in the data store settings view, for example: abc123.us-west-1.a.p0.satoricyber.net.
Connecting with the Snowflake Classic UI
For username/password authentication open a browser and connect to your Satori hostname, for example: abc123.us-west-1.a.p0.satoricyber.net. Enter your username and password and click Login.
Connecting with Snowsight
To connect with Snowsight, follow the instructions to connect to the Snowflake Classic UI. Once logged-in to the classic UI, click on the Preview App link to connect to Snowsight.
Connecting with SnowSQL
To connect with SnowSQL, add the host parameter to the command. For example:
snowsql -a abc123 -u john@example.com -h abc123.us-west-1.a.p0.satoricyber.net
Connecting with Python
To connect with Python, add the host parameter to the connect function. For example:
con = snowflake.connector.connect(
  user="john@example.com",
  password="**********",
  account="abc123"
  host="abc123.us-west-1.a.p0.satoricyber.net"
)
Connecting with the JDBC driver
To connect with the JDBC driver, override the host element in the JDBC URL with the Satori hostname for Snowflake and add the account parameter. For example, to connect to the abcd123 Snowflake account in Azure East US 2:
jdbc:snowflake://abc123.eastus2.z.p0.satoricyber.net/?user=john@example.com&account=abc123.eastus2.
For more information regarding Snowflake account names, see the Snowflake Documentation.
Connecting with the ODBC driver
To connect with the ODBC driver, override the server parameter with the Satori hostname. For example: abc123.us-west-1.a.p0.satoricyber.net.
Connecting with Tableau
Tableau uses the ODBC driver to connect to Snowflake. Override the server parameter with the Satori hostname. For example: abc123.us-west-1.a.p0.satoricyber.net.
Connecting with Looker
Looker uses the JDBC driver to connect to Snowflake. Override the Remote Host:Port parameter with the Satori hostname. For example: abc123.us-west-1.a.p0.satoricyber.net:443.
For additional integration options with Looker, see here.
Connecting with Sigma
Sigma uses the Go driver to connect to Snowflake. When configuring a Snowflake connection, use the Use Custom Host toggle, then add your Satori hostname (for example: abc123.us-west-1.a.p0.satoricyber.net:443) in the Custom Hostname field.
Connecting with Power BI Desktop
Power BI Desktop uses the ODBC driver to connect to Snowflake. Override the Server parameter with the Satori hostname. For example: abc123.us-west-1.a.p0.satoricyber.net.
Connecting with Redash (redash.io)
Redash uses the Python connector to connect to Snowflake. Override the host parameter with the Satori hostname, under additional options. For example: abc123.us-west-1.a.p0.satoricyber.net.
Connecting with Superset
Superset uses the Python SQL Alchemy connector to connect to Snowflake. Add a host parameter to the connection URL with the Satori hostname. For example: &host=abc123.us-west-1.a.p0.satoricyber.net.
Connecting with dbt
dbt uses the Snowflake Python SQL connector to connect to Snowflake.
For dbt Core, add a host parameter to the profiles YAML file (profiles.yml). For example: host: abc123.us-west-1.a.p0.satoricyber.net
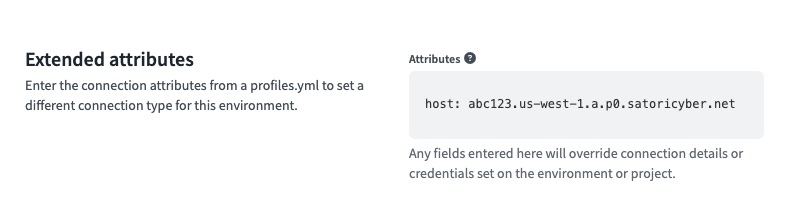
For dbt Cloud, dbt exposes Extended Attributes, which allows users to set a profiles.yml snippet in their Environment settings. Under the Deployment Settings for your Environment, add a host paramenter to the Extended attributes. For example the host: abc123.us-west-1.a.p0.satoricyber.net
Network Policy Settings
Satori provides you with the ability to define your network security policy for your data store.
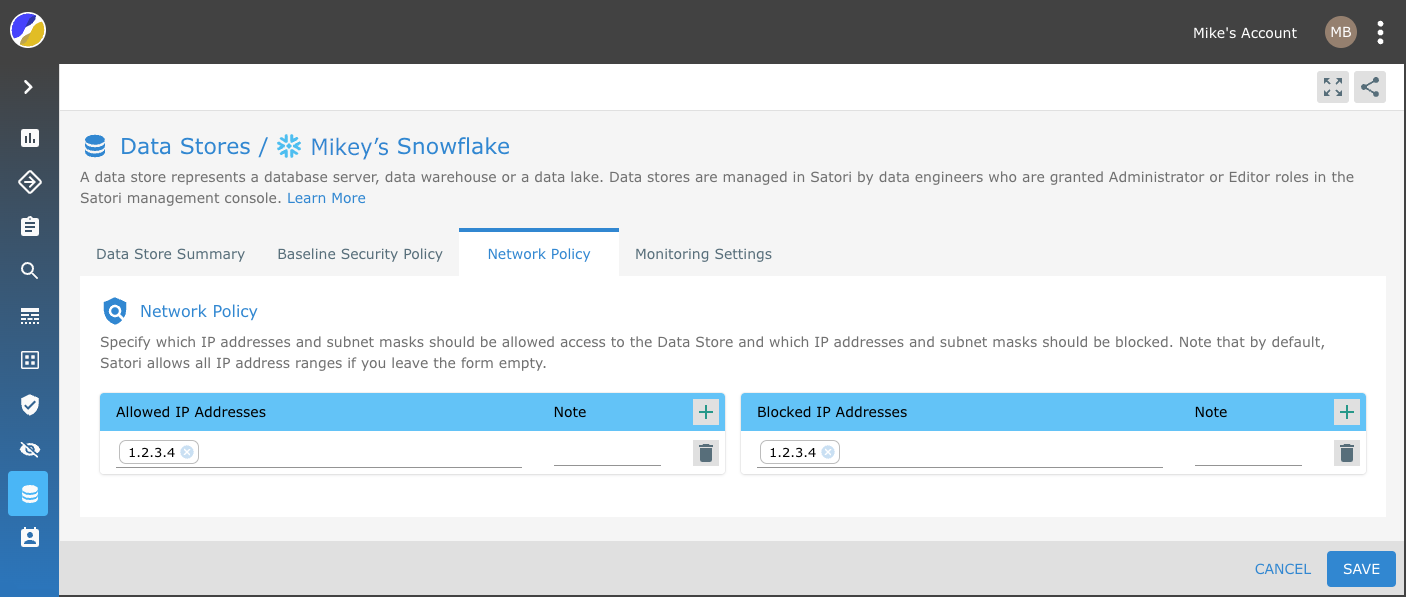
Simply, specify which IP addresses and subnet masks should be allowed access to the Data Store and which IP addresses and subnet masks should be blocked. Note that by default, Satori allows all IP address ranges if you leave the form empty.
Example 1
To allow all IP addresses leave the form empty.

Example 2
To block specific IP addresses add them to the blocked IP address list.

Example 3
To only allow access to specific IP addresses add them to the allow list. Note: Access from all ohter IP addresses ware blocked.

Example 4
To allow access from a specific IP address range while blocking parts of the range add the IP range to the list of allowed IP addreses and add the IP address that you wish to block to the Block list.
