SAML-based Single Sign-On for Snowflake (SSO)
SAML-based SSO is supported by Satori for Snowflake. Follow the instructions below to configure a SAML 2.0 application in your Identity Provider to route users who login using SSO via Satori.
Create a SAML Application
The first step is to create a SAML application in your Identity Provider that points to Satori instead of directly to Snowflake.
Okta
- Go to the Applications view in the Okta admin console
- Select “Create New App” and choose SAML 2.0
- Enter app name and additional details like logo, etc.
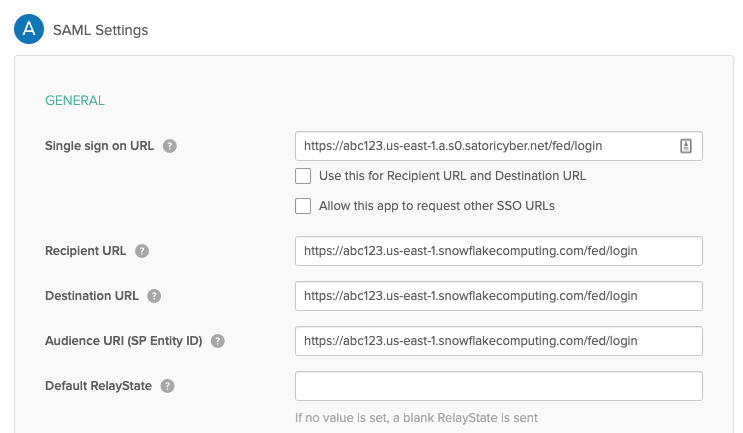
- Under “General”, in the Single Sign-On URL, enter the Snowflake login URL with your Satori generated hostname. For example:
https://abc123.us-east1.a.p0.satoricyber.net/fed/login - Uncheck the “Use this for Recipient URL and Destination URL” option
- Enter the Snowflake original login URL in the following fields: Recipient URL, Destination URL, Audience URI (SP Identity ID). For example:
https://abc123.us-east1.snowflakecomputing.com/fed/login - Complete the rest of the fields and click “Finish”
OneLogin
- Go to the Applications view in the OneLogin console.
- Select Add App and select the SAML Custom Connector (Advanced) application.
- Set a name, description and logo for the application and select Save.
- Select the Configuration tab.
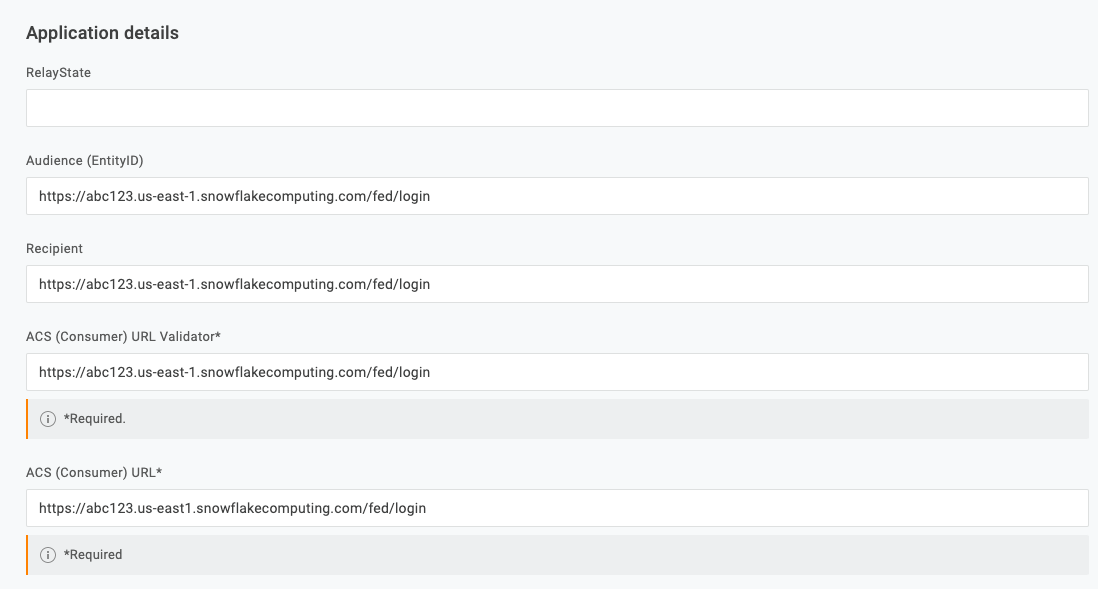
- Enter your original Snowflake hostname in the following fields:
Audience (EntityID),RecipientandACS (Consumer) URL Validator. For example:https://abc123.us-east1.snowflakecomputing.com/fed/login. - Enter the Satori hostname in the
ACS (Consumer) URLfield, for example:https://abc123.us-east1.a.p0.satoricyber.net/fed/login. - In the SSO tab, select the
SHA-256option in theSAML Signature Algorithmfield.
AzureAD
When using AzureAD as the Snowflake SAML Identity Provider, Satori acts as a SAML proxy between AzureAD and Snowflake. Follow these steps to configure the trust relationship between AzureAD and Satori.
- Go to the Satori management console.
- Select the Identity Providers section, click Add and select AzureAD.
- Select the Snowflake data store to configure the integration for.
- In a new browser window, go to your AzureAD console and access the Enterprise Application view.
- Select the application you use to enable access to a Satori-protected data store.
- Select the Single sign-on view and press Edit in the Basic SAML Configuration section.
- Change the Identifier (Entity ID) field to the value of the Satori Identifier (Entity ID), as shown in the Satori management console. For example, from
https://abc123.us-east-1.snowflakecomputing.com/tohttps://abc123.us-east-1.a.p0.satoricyber.net. - Change the Reply URL (Assertion Consumer Service URL) field to the value of the Satori Reply URL (Assertion Consumer Service URL) as shown in the Satori management console. For example, from
https://abc123.us-east-1.snowflakecomputing.com/fed/logintohttps://abc123.us-east-1.a.p0.satoricyber.net/fed/login. - In the SAML Signing Certificate section, download the Certificate (Base64) file.
- Upload the certificate file to the Satori management console in the SAML Signing Certificate (Azure) field.
- Copy the Login URL and AzureAD Identifier fields from the Set up
section in AzureAD. - Update the Login URL and AzureAD Identifier fields in the Satori management console using the values you copied in the previous step.
Configure Snowflake
After a SAML application has been configured in the Identity Provider, configure Snowflake to trust the new SAML application. See the Snowflake documentation for reference.
Please note that when updating existing SAML-based SSO integration in Snowflake, access to Snowflake via an existing application might be disabled.