Security in Amazon Redshift
Redshift is the world’s most popular cloud data warehouse solution and is currently utilized by tens of thousands of organizations worldwide. It’s based on modified PostgreSQL and provided by AWS. Its access control can be broken down into the following three areas:
Cluster management, meaning the ability to create, configure and delete the infrastructure itself (i.e. Redshift clusters). These operations are controlled by AWS security credentials and can be carried out by IAM users from the console or by API.
Cluster connectivity, meaning the network access control. This is based on CIDR (Classless Inter-Domain Routing) security groups.
Database access, meted out per securable object (database, table, column or view) and configured by SQL GRANT & CREATE commands. Temporary access is also available via specific connection strings using AWS IAM users. If you already manage user identities outside of AWS, you may use IAM identity providers instead of creating IAM users in your AWS account.
This guide will cover the following:
Network access control in AWS Redshift
Network access control in AWS Redshift is managed by the network infrastructure configuration in your AWS account. This is where you can set cluster connectivity, limitations within your VPC or whether it opens publicly or through a VPN. Redshift’s network configuration settings are more or less identical to access configuration of other AWS resources and will not be covered in this specific guide.
Note that, when setting network access on Redshift, you’re setting your connectivity to the entire cluster. This will limit your options for more granular control, preventing you from allowing access to specific securable objects (databases, tables, views, columns or rows) or only granting certain IP addresses access to specific sensitive data.
Managing Redshift access across users, roles and groups
You can either manage your users and groups within Redshift, or use AWS IAM users assigned via the connection string. The privileges to access specific objects (i.e. access to tables) are tightly coupled with the DB engine itself, and are configured via Redshift SQL commands.
Groups can be viewed as roles and can therefore be assigned to users. A user inherits the privileges from the group (or groups) they belong to.This means that, if we have a sales group and a marketing group, we can assign salespeople to the sales group and marketing employees to the marketing group. We can then assign selected “power users” with access to both groups.
An example of setting group privileges in Redshift:
/* Creating the 2 groups */
CREATE GROUP sales;
CREATE GROUP marketing;
/* Creating the 2 schemas with the data */
CREATE SCHEMA sales;
CREATE SCHEMA marketing;
/* Give sales USAGE rights in schema, and read-only (SELECT) access to the tables within the schema */
GRANT USAGE on SCHEMA sales to GROUP sales;
GRANT SELECT ON ALL TABLES IN SCHEMA sales TO GROUP sales;
/* Give sales USAGE rights in schema, and read-only (SELECT) access to the tables within the schema */
GRANT USAGE on SCHEMA marketing to GROUP marketing;
GRANT SELECT ON ALL TABLES IN SCHEMA marketing TO GROUP marketing;
In the following example, we have a sales person (sales_person1), a marketing person (marketing_person_1) and a power user called marketing_and_sales.
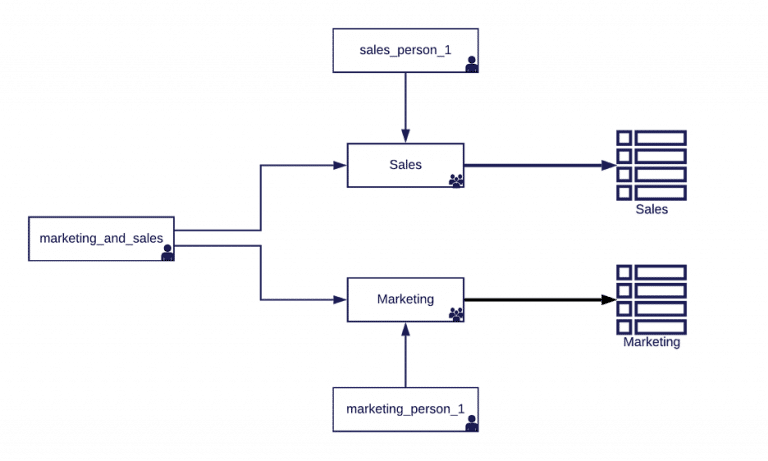
Using groups as roles in Redshift:
CREATE USER sales_person1 password 'xyzzy-1-XYZZY';
ALTER GROUP sales ADD USER sales_person1;
CREATE USER marketing_person1 password 'xyzzy-1-XYZZY';
ALTER GROUP marketing ADD USER marketing_person1;
CREATE USER marketing_and_sales password 'xyzzy-1-XYZZY';
ALTER GROUP marketing ADD USER marketing_and_sales;
ALTER GROUP sales ADD USER marketing_and_sales;
To view assigned roles to users in your Redshift cluster, you can use the following command:
SELECT usename AS user_name, groname AS group_name
FROM pg_user, pg_group
WHERE pg_user.usesysid = ANY(pg_group.grolist)
AND pg_group.groname in (SELECT DISTINCT pg_group.groname from pg_group);
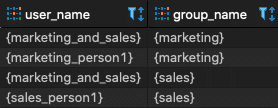
This will give you the following settings, where you can see a user in each group as well as the ‘marketing_and_sales’ power user belonging to both groups:
There is no hierarchy in the privileges model, which means that you can’t set “sub-groups” that inherit privileges from other groups. Moreover, while users enjoy accumulated privileges according to their groups, you can’t choose which group to use for each query or session.
Fine-grained Redshift access control
AWS Redshift offers fine-grained access control by allowing configuration of access controls to databases, tables and views, as well as to specific columns in tables. This can be set in the SELECT level (reading data), UPDATE level (updating data) or ALL (both).
Let’s take a look at this feature in action. Let’s say that ACME international has a table called Orders, containing all of the details recorded for each order. The company has a shipping team, which currently has read-only access on this table (due to the decision that allowing them to update data could pose risks to ACME).
Here’s how we set up this example in Redshift:
/* Creating a very naive orders table... */
CREATE TABLE demo.public.orders (
order_id varchar(255), order_checksum int, shipping_firstname varchar(50),
shipping_middlename varchar(25), shipping_lastname varchar(50),
shipping_street1 varchar(255), shipping_street2 varchar(255),
shipping_street3 varchar(255), shipping_zipcode varchar(15),
shipping_pob varchar(15), shipping_city varchar(50),
shipping_phone1 varchar(50), shipping_phone2 varchar(50),
shipping_cellular varchar(50), shipping_hours varchar(50),
shipping_comments varchar(255), payer_creditcard varchar(19),
payer_expmonth varchar(2), payer_expyear varchar(4),
payer_firstname varchar(50), payer_middlename varchar(25),
payer_lastname varchar(50), payer_street1 varchar(255),
payer_street2 varchar(255), payer_street3 varchar(255),
payer_zipcode varchar(15), payer_pob varchar(15), payer_city varchar(50),
payer_phone1 varchar(50), payer_phone2 varchar(50), payer_cellular varchar(50),
payer_hours varchar(50), payer_comments varchar(255));
/* Creating the shipping user */
CREATE USER shipping PASSWORD 'xyzzy-1-XYZZY';
/* Giving the user read-only access  */
GRANT SELECT ON demo.public.orders TO shipping;
/* And now with the shipping user we can do: */
SELECT * FROM demo.public.orders;
Note: using xyzzy-1-XYZZY as your password is obviously not recommended.
Following an audit performed by the privacy officer, it was found that the order details contained PCI (Payment Card Information), which should not be available to the shipping team. In Redshift, we can now allow access to the rest of the data, except for the payer_creditcard, payer_expmonth, payer_expyear columns.
How to set column level security in Redshift:
/* Revoking the existing SELECT privilege on the entire table */
REVOKE SELECT ON demo.public.orders FROM shipping;
/* Granting SELECT privilege specifically to all columns except for the forbidden ones */
GRANT SELECT(order_id, order_checksum, shipping_firstname,
shipping_middlename, shipping_lastname, shipping_street1,
shipping_street2, shipping_street3, shipping_zipcode, shipping_pob,
shipping_city, shipping_phone1, shipping_phone2, shipping_cellular,
shipping_hours, shipping_comments, payer_firstname, payer_middlename,
payer_lastname, payer_street1, payer_street2, payer_street3, payer_zipcode,
payer_pob, payer_city, payer_phone1, payer_phone2, payer_cellular,
payer_hours, payer_comments)
ON demo.public.orders TO shipping
Row level security in Redshift
Row level security means that, in a certain table, certain users can only access specific rows. These rows should have criteria (usually based on the value of one of the columns) that define which role can access the specific item (row). In certain cases, this additionally requires a translation or lookup table to define relations between roles and the type of items they can access within the specific table.
Setting up row level access control in Redshift is rather complicated, but not impossible. Let’s take a look at this proof of concept:
In this example, we have a table called department_employees, which contains details about the employees in each department. Let’s create the table and populate it with employees from our sales & marketing teams:
CREATE TABLE department_employees (
id int,
name varchar(50),
phone varchar(50),
salary smallint,
department varchar(50));
INSERT INTO department_employees VALUES
(1, 'Seller McSeller', '+1-212-5555555', 180, 'sales'),
(2, 'Sir Sell-A-Lot', '+1-212-5556666', 240, 'sales'),
(3, 'Marky McMarket', '+1-716-5555555', 210, 'marketing'),
(4, 'Sir Market-A-Lot', '+1-716-5556666', 270, 'marketing');
Now, let’s imagine that we just got a directive that only accountants specific to the specific groups will be able to see employee details. In this example, only accountants with the group ‘marketing’ will be able to see Marky McMarket & Sir Market-A-Lot’s details.
Our initial instinct may be to implement this by checking the CURRENT_USER_ID (or CURRENT_USER) of the connected user and match it with the users & groups information from pg_user & pg_group. Unfortunately, in Redshift, it is not possible to mix this information (from leader node) with the query to the entire cluster. Instead, consider adding a table mapping each user to their respective roles:
CREATE TABLE users_to_groups
(user_name varchar(100), group_name varchar(100));
INSERT INTO users_to_groups VALUES
('marketing_accountant', 'marketing');
/* Let's also create an accountant user */
CREATE USER marketing_accountant WITH PASSWORD 'xyzzy-1-XYZZY';
Now that we have the table and the user, we create a view, which will pull information from the department_employees, filtered according to users_to_groups, and grant SELECT privilege to the user marketing_accountant:
CREATE VIEW v_department_employees AS
SELECT * FROM department_employees
WHERE department IN (SELECT user_name, group_name FROM users_to_groups WHERE user_name=CURRENT_USER);
/* Granting access to the user in views */
GRANT SELECT ON users_to_groups TO marketing_accountant;
GRANT SELECT ON v_department_employees TO marketing_accountant;
/* Switching to use the context of the user 'marketing_accountant' */
SET SESSION AUTHORIZATION marketing_accountant;
SELECT * FROM department_employees;
/* We get a permission denied error, as we don't have access to the table itself:
 Invalid operation: permission denied for relation department_employees */
SELECT * FROM v_department_employees;
/* We now get the filtered rows */
After doing this, we now get a filtered view of only the items we should see:

While simplified, this implementation works. When testing, it is best to use the User ID instead of User Name for performance reasons. However, you can also enforce the same logic via a UDF (User Defined Function) to incorporate in the views or use a BI tool, such as quicksight, to enforce row level security. The latter will limit you to the data you query through that BI overlay.
Access logging & monitoring in Redshift
Logging failed and successful access attempts to Redshift data warehouses can be achieved by either using the system table STL_CONNECTION_LOG or by enabling audit logs (which are kept in S3 buckets).
Note that the audit logs are not enabled by default, meaning that you will need to manually enable them.
How to set up audit logs for AWS redshift
his explanation will focus on setting up audit logs from the AWS console. You can also do this by using AWS API or CLI. Note that keeping audit logs, especially activity monitoring for data warehouses with a lot of activity, may incur high costs. It is important to take this into account prior to enabling audit logs.
To enable audit logs, edit the Audit logging section under ‘Maintenance and monitoring’ in the cluster configuration:

Inside, configure the S3 bucket definitions. For example:
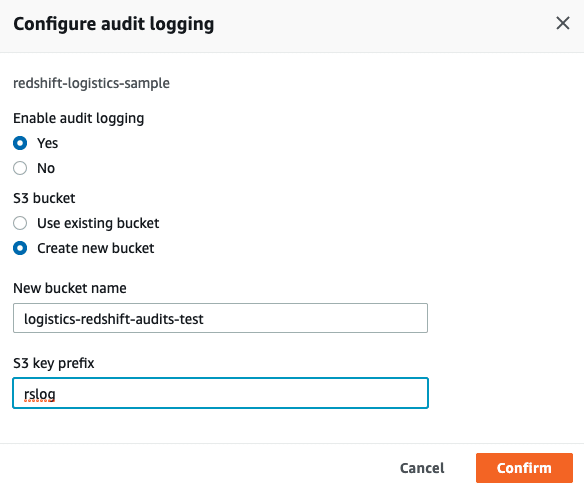
If you would also like to log user activity (queries running against the data warehouse), you must enable activity monitoring, too. This will add a significant amount of logs to your logging S3 bucket.
Enabling activity monitoring in Redshift:
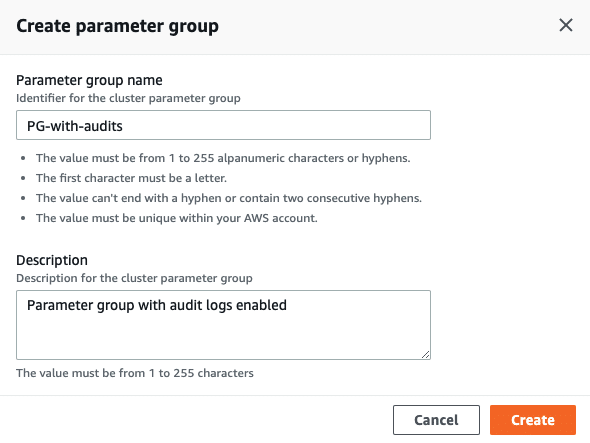
Step 1: create a new parameter group in your Redshift cluster.
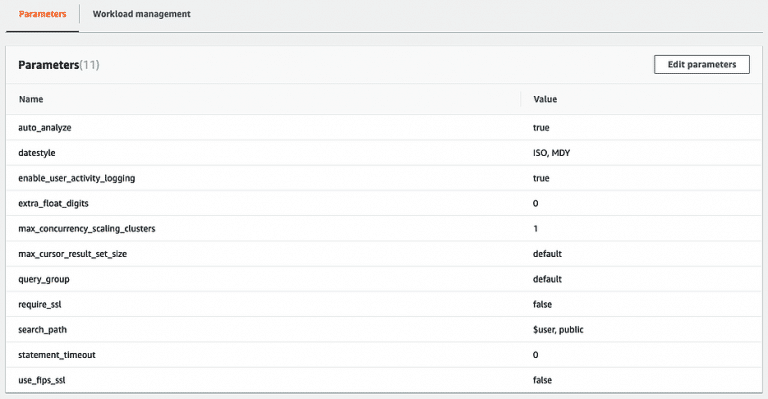
Once the new parameter group is created, edit the parameters and set enable_user_activity_logging to true:
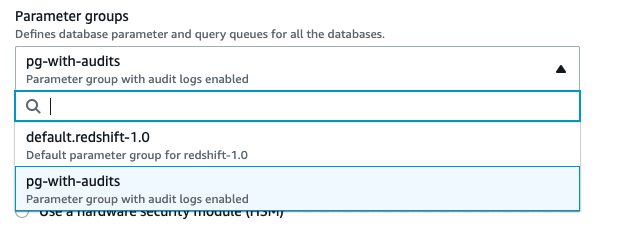
Within the database configuration, set the database configuration to the new parameter group you created. For example:
How long do AWS Redshift keep access logs?
When using the system tables, consider that AWS claims that retention time is only two to five days (though in a test cluster, we’ve seen log records of about seven days). Such a short retention span is useful for troubleshooting, but not for tracking behavior over a long period of time or performing incident response for incidents that elapsed outside of the retained time frame.
On the other hand, when enabling audit logs, the logs are kept indefinitely, unless you set a S3 lifecycle setting on that bucket or perform an ETL operation to purge and compact your data. Purging the data may be necessary if you only want to access data for specific use-cases. Compacting it means removing access logs which you will probably not need, such as connections by the rdsdb user used by AWS for maintenance.
It is also important to note that, since system tables are kept on the cluster nodes and audit logs are saved separately from the Redshift cluster itself (in S3 buckets), access to the audit logs can be achieved separately from the Redshift access (i.e. allowing the security team access to the S3 buckets without having to give them access to the Redshift data warehouse itself).
Here are some fun examples of querying access logs for useful information:
How to look specifically for failed logins?
SELECT *
FROM stl_connection_log
WHERE event='authentication failure'
ORDER BY recordtime;
Showing successfully authenticated users with the number of successful authentications:
SELECT username, event, COUNT(*)
FROM stl_connection_log
WHERE event = 'authenticated'
GROUP BY 1, 2
ORDER BY 3 DESC;
Showing successfully authenticated users by hourly buckets:
SELECT DATE_PART(YEAR, recordtime) || '-' ||
	LPAD(DATE_PART(MONTH, recordtime),2,'0') || '-' ||
	LPAD(DATE_PART(DAY, recordtime),2,'0') || ' ' ||
	LPAD(DATE_PART(HOUR, recordtime),2,'0') AS hour_bucket, username, COUNT(*)
FROM stl_connection_log
WHERE event = 'authenticated'
GROUP BY 1, 2
ORDER BY 1, 2 DESC;
/* Showing an hourly breakdown of users authenticating, excluding rdsdb */
SELECT DATE_PART(YEAR, recordtime) || '-' ||
	LPAD(DATE_PART(MONTH, recordtime),2,'0') || '-' ||
	LPAD(DATE_PART(DAY, recordtime),2,'0') || ' ' ||
	LPAD(DATE_PART(HOUR, recordtime),2,'0') AS hour_bucket, username, COUNT(*)
FROM stl_connection_log
WHERE event = 'authenticated'
AND username != 'rdsdb'
GROUP BY 1, 2
ORDER BY 1, 2 DESC;
Showing a list of the connection drivers used by the redshift users:
SELECT username, application_name, COUNT(*)
FROM stl_connection_log
WHERE application_name != ''
GROUP BY 1,2
ORDER BY 1,2;
By analyzing this information, you may get indications of anomalous behavior by clients, or usage of tools you do not want users to use. Note that this information is only available for successfully authenticated users.
Privilege violation logging & monitoring in AWS Redshift
Prior to setting such access controls, you will be able to see queries pulling data from these resources by querying STL_QUERY, as seen below:
Retrieving queries access to specific objects in Redshift:
SELECT * FROM STL_QUERY
WHERE userid!=1
AND querytxt LIKE '%customers%'
ORDER BY query DESC
LIMIT 100;
However, In AWS Redshift, there is no failed SQL queries log. Therefore, if you do not allow access to specific securable objects, you will not be able to get visibility into access attempts to those objects. This may be viewed as a weak audit trail, given that you do not need to audit cases where users attempt to execute forbidden queries or actions.
Identity management integration for federation
While you can configure users and groups within AWS Redshift itself, it does not scale well for large organisations. That is true for other data warehouses as well, as managing your identities in a centralised location reduces overhead and risks. Redshift integrates with identity providers such as ADFS or Okta (or any other IDP that supports SAML 2.0 or OIDC.
Once integrated, Redshift obtains the users and groups settings from the IDP, and you can set the privileges for the appropriate groups (and if needed also users) via the GRANT command, as described above.
Conclusion
AWS Redshift provides a helpful set of tools for controlling access and securing your data warehouse clusters. For some use-cases, such as those requiring granular or dynamic access controls, it is challenging to achieve business objectives with Redshift alone.
This is where Satori is happy to step in and help.
Satori and network access control
Satori can help you achieve significantly more granular network-based access control when deployed in front of a Redshift data warehouse. For example, using Satori, you can allow global access to your Redshift data warehouse while prohibiting access to specific resources (databases, schemas, tables, rows or columns) outside of a certain set of IP addresses.
Satori and fine-grained access control of Redshift
When deploying Satori in front of a Redshift environment, you can create column, row and cell-based granular access controls tied to business rules instead of securable objects. This enables easy maintenance of such policies and a gradual roll-out process (beginning with alert-only for a subset of your data consumers). You can also achieve easy visibility into the existing data access patterns and violations on the Satori dashboard.
In addition, you can set fine-grained access control according to classified data types, instead of database objects.
Satori and keeping track of access violations
Satori keeps track of logins and sessions to Satori-protected Redshift environments, enabling security policies to handle such violations as well as enhanced visibility into suspicious incidents.
Satori and handling data protection of Redshift permission issues
By using Satori, access control violations (whether in “alert” mode or blocked) are logged without limitations. We also remove the need to worry about extracting raw data from S3 buckets by transforming and loading it into a separate data store you can query at your leisure. This allows security teams to gain full visibility into past violations and take appropriate action.


